|
Contributed by Tiffany McGregor
This twist on classic hummus is basically a bean dip with a fancy name! It’s super delicious, super easy to make, and a super snack for crowds that might include vegans or friends with gluten sensitivities. The roasted garlic and rosemary lend to the Tuscan feel of this recipe, but feel free to get creative! Craft your own with any combo of different herbs and spices and give it a name of your own! Buon appetito! You’ll need: oven (if using roasted garlic), aluminum foil, food processor, knife, cutting board, bowl, measuring spoons Prep time: 10 minutes (plus about 45 minutes if using roasted garlic) Serves: a crowd (makes about 2 cups) Ingredients:
*The liquid that the beans are packed in can thicken the hummus as it blends in the food processor; sometimes that’s a good thing and other times not so much. You can choose to drain the beans or toss them in as is, gradually adding some water at the end in order to thin it out and achieve the consistency you prefer. For the first attempt, I would recommend draining the beans. Directions: Into the bowl of a food processor, add the beans, roasted garlic, tahini, lemon juice (and zest if you have it), cumin, paprika, and rosemary. Pulse a few times until the ingredients are roughly chopped and slowly drizzle in the olive oil while continuing to blend. If the mixture still seems too thick or chunky, gradually drizzle in some water a teaspoon at a time until desired consistency is reached. Season to taste with salt and pepper. Top it with an extra drizzle of olive oil and a few sprinkles of the herbs and spices you used as a garnish. This hummus is great with raw veggies, pita crisps, or tortilla chips. **To roast garlic: Heat oven to 350 degrees. Slice across a bulb of garlic, about ¼ of the way down from the pointy top, exposing the cloves inside. Toss away the top and pop the bulb onto a piece of foil, drizzle generously with olive oil, salt and pepper. Bundle the bulb in the foil and roast in the oven for 45 minutes to an hour. You’ll end up squeezing the caramelized cloves up and out of their husks, so allow enough time for it to cool before you handle it. Pro Tip: If you don’t have an oven or the time to roast the garlic, you can use it raw, but you will use a great deal LESS! Roasted garlic is sweet and mellow, but raw garlic can be strong and spicy! If you are going raw, start off with one clove and give it a rough chop before throwing it into the food processor. You can always add more, but you can’t remove the garlic!
0 Comments
Contributed by Tiffany McGregor
I’m not going to lie, I buy lots of jarred salsa verdé because I love salsa verdé, I use it for both snacking and cooking, and keeping a jar around is pretty convenient. Still, this recipe comes together so quickly and tastes so much better than any jarred variety that I have ever had that I really try to whip it up on my own whenever possible. It’s bright and tangy with just a little bit of spiciness and heat from the garlic and jalapeno, so it is great with tortilla chips or on top of grilled meats or fish. Time: 20 minutes Serves: a crowd Tools: Oven, Foil, Blender, Baking Pan. Sharp Knife, Cutting Board Ingredients:
Instructions:
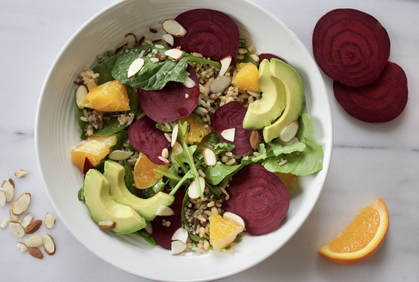 Contributed by Sunny West
Beets! The green leafy portion of the beet can be eaten. The smaller leaves can be cut up and used raw in salads, while the larger leaves are most commonly served boiled or steamed; they have a taste and texture like spinach. You can boil, steam or cook them in a microwave. Beets can be eaten boiled or steamed and peeled, then eaten warm with or without butter. Beets can be cooked, pickled, and then eaten cold as a condiment, or even peeled, shredded raw, and then eaten as a salad. This recipe uses raw beets to create a healthy and delicious salad for on the go. You’ll need: One mixing bowl, a knife, a cheese grater (optional), cutting board, measuring cups Ingredients
|
Archives
November 2019
Categories |
 RSS Feed